equipment and techniques for astrophotography
Amateur astronomers are of several types. Some observe the night sky with naked eyes, some with a pair of binoculars, others with telescopes, both self made and bought commercially, while there are some more who are not content with just visually observing the night sky. They like to capture or record these astronomical objects on media for future reference, or just to show off.
Jokes apart, astrophotographers can be a very serious lot. Unlike visual observing wherein the procedure is fairly straightforward involving a telescope, eyepieces and optional star maps, astrophotography requires a lot of pre planning, more sophisticated equipment.
Jokes apart, astrophotographers can be a very serious lot. Unlike visual observing wherein the procedure is fairly straightforward involving a telescope, eyepieces and optional star maps, astrophotography requires a lot of pre planning, more sophisticated equipment.
The story of astrophotography starts with John Adams Whipple (1822-1891). He, along with William Cranch Bond, director of Harvard Observatory, used the great refractor at Harvard to make daguerreotypes of the Moon. Humans, with their penchant for technical advancement, have come a long way since exposing silver plates to light to record images. We are now in the age of the Silicon, and with every advancing day electronic equipments are shrinking in size, while the technology grows by several magnitudes. Astronomers started using glass plates for photographing the stars through large telescopes, then they moved on to photographic film of large format, now they use electronic, photo sensitive chips made of semiconductor material like Complementary Metal Oxide Semiconductor (CMOS) or Charge Coupled Device (CCD). But what exactly is required for capturing the Cosmos on an Amateur scale? Below I shall explain some of the equipment required, and in some cases complete technique of how to take your first photos of the night sky.
Wide Field Astrophotography:
Equipment Required:
Camera: E.g. Canon 550D, Digital SLR or Pentax S1 film SLR. Both these cameras are capable of being completely controlled manually. That is the user can define the aperture of the lens, the focal length, focus distance and the exposure length.
Remote controller: The digital SLR cameras use an Intervalometer, employed to electronically program the camera to take a user defined number of exposures, of defined exposure time. The film SLR camera can be controlled by the use of a Cable release that permits the user t time his exposure.
Tripod: A very sturdy tripod with a pan and tilt head to attach and point the camera at the region of interest in the sky.
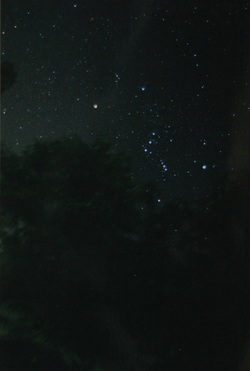
Procedure: Tripod and SLR photography is perhaps best done from a location that is far away from intruding light pollution like street lamps, and city lights. A village is perhaps ideal. Reach the location with lots of daylight to spare. Mount the camera on the tripod during the day time and choose a lens with a short focal length (if a single focal length) or say medium focal length like 28mm in a kit lens (multiple focal length lens). Set the aperture to the widest possible, like F3.8 or F/4.0. Point the camera at a tree at a distance of about a hundred meters and focus. If the lens has an infinity mark on it, set it to the mark. This is done because stars are considered to be at infinity for all practical purposes. Now that you are ready to shoot the stars, simply point the camera to the region of interest in the sky like the Milky Way or some bright constellation like Orion. Called Diurnal motion, the movement of the sky is about 1 arc minute every 15 seconds. Any exposure longer than 15 seconds results in noticeable trails in the photo taken. To register the milky way prominently on the sensor of the DSLR, one can take several exposures of 15 seconds, then using a free software like deep sky stacker, the user can stack all the photos on top of each other to add the signal or data. One can then use the levels and curves option in Photoshop to bring out the detail in the photo. The exact details are beyond the scope of this article as Astrophotography itself is a topic worthy of an entire book. an example of a wide field photo taken using a film SLR and tripod is shown on the left.
Equipment Required:
Camera: E.g. Canon 550D, Digital SLR or Pentax S1 film SLR. Both these cameras are capable of being completely controlled manually. That is the user can define the aperture of the lens, the focal length, focus distance and the exposure length.
Remote controller: The digital SLR cameras use an Intervalometer, employed to electronically program the camera to take a user defined number of exposures, of defined exposure time. The film SLR camera can be controlled by the use of a Cable release that permits the user t time his exposure.
Tripod: A very sturdy tripod with a pan and tilt head to attach and point the camera at the region of interest in the sky.
Procedure: Tripod and SLR photography is perhaps best done from a location that is far away from intruding light pollution like street lamps, and city lights. A village is perhaps ideal. Reach the location with lots of daylight to spare. Mount the camera on the tripod during the day time and choose a lens with a short focal length (if a single focal length) or say medium focal length like 28mm in a kit lens (multiple focal length lens). Set the aperture to the widest possible, like F3.8 or F/4.0. Point the camera at a tree at a distance of about a hundred meters and focus. If the lens has an infinity mark on it, set it to the mark. This is done because stars are considered to be at infinity for all practical purposes. Now that you are ready to shoot the stars, simply point the camera to the region of interest in the sky like the Milky Way or some bright constellation like Orion. Called Diurnal motion, the movement of the sky is about 1 arc minute every 15 seconds. Any exposure longer than 15 seconds results in noticeable trails in the photo taken. To register the milky way prominently on the sensor of the DSLR, one can take several exposures of 15 seconds, then using a free software like deep sky stacker, the user can stack all the photos on top of each other to add the signal or data. One can then use the levels and curves option in Photoshop to bring out the detail in the photo. The exact details are beyond the scope of this article as Astrophotography itself is a topic worthy of an entire book. an example of a wide field photo taken using a film SLR and tripod is shown on the left.
