Many amateur astronomers who step into astrophotography understandably have many questions regarding imaging sensors. By far, one of the most frequent question is about the Noise (not sound, electronic disturbance) present in the captured frames which is a result of the heat generated in the sensor. 
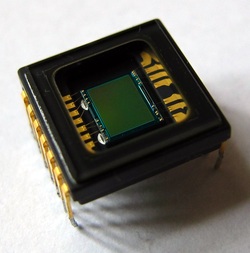
The CCD or CMOS sensors like the one shown on the left side are electronic devices that translate the capture of photons to electric signals, read out by the computer as an image. Now since we know that electricity, when flowing through any material which has resistance generates heat, so it does with the sensor. This heat shows up as "noise" in the image. One effective method to rid the images of this heat signature is via the process of dark subtraction. Simply speaking, the astrophotographer will stop light from entering the camera sensor by closing its cap or lid, then initiate one or multiple exposures in the camera with the exact same settings (exposure time and temperature) used to capture the image for which the dark needs to be subtracted. By closing the cap of the camera the intention is to allow no other signal to be captured in the sensor except the heat signature. Therefore, a certain "dark" frame is the heat signature of the sensor for "that" exposure time. Also, as an example, 1 minute dark will have lesser heat shown which corresponds directly to the heat produced because of all the electricity flowing through the sensor. Similarly 5 minute will show more "heat" as the electricity flows through the sensor for a long duration, giving it "time" to heat up the sensor. Therefore, a Dark frame is also like a "Fingerprint" of that property of the sensor, which shows whether it gets heated quickly or not. This is also the reason that some CCD sensors are more expensive than others. The expensive sensors get heated less even if exposed for longer and hence display lesser noise when compared to cheaper CCD chips. The Sony ICX285AQ, used in Starlight Xpress H9, The Opticstar DS-145 ICE, and ATIK 314L series all have this sensor and are more expensive when compared to cameras featuring for example the Kodak 8300 chip. Every exposure therefore needs to have a corresponding
0 Comments
The Comet ISON is almost here and we amateur astronomers and astrophotographers only hope that it will survive the swing by the Sun and give us a spectacular show and become what everyone predicted it would. The comet of the Century. Live update about this comet is available at the link below.
Astronomers have found a planet without a host star. It does however belong the Beta Pictoris system. This planet is a young one at a mere 12 million years old and five times the size of Jupiter.
At a distance of 80 light years, it is pretty close to us. For more info click the button. A beginner in Amateur Astronomy often misunderstands the concept of Barlow lenses and their use.Below is my take on the topic. I have cut down quite a bit of information and the information is meant for the absolute novice. The reason I have chosen a Celestron 114mm reflector as an example. I do not intend to support the company or Malign their quality in any way, and it is therefore a mere example. Barlows are used to increase the focal length of the telescope, thereby increasing the magnification obtained. Every telescope has its upper limit, and from a city/town the upper limit for a Newtonian reflector telescope is 35x per inch. Consider a telescope has 4.5 inch mirror (114mm). With this you can get a max of 157x magnification. That 20mm erecting eyepiece supplied with many such telescopes is useless, so its best thrown away. This telescope has a built in barlow inside the focuser. This is not a good thing and is found in cheap quality telescopes. Adding another barlow to it only degrades the view very much. Now secondly, as far as viewing deep sky objects is concerned, these objects are faint. To see them clearly, you need maximum amount of light entering the eye. In other words, the field of view of the telescope has to be maximum. To obtain maximum field of view, you need minimum magnification. That is the focal length of the eyepiece has to be as small as possible, preferably a 30 or 32mm eyepiece will work. If the user uses a barlow and assumes that he/she can see deep sky objects bigger, then the user is wrong. A 2x barlow reduces the field of view by half and a 3x barlow is even worse. With the above telescope I will not recommend a barlow at all. For high magnification, one should purchase a 4mm plossl eyepiece, for low magnification a 32mm plossl eyepiece, or any focal length close to that. Together these will cost about 5000 Rs in India or $40-$50 in USA, but will be useful on any telescope. I have deliberately answered the question of Barlows with reflectors, but they apply towards Refractors and cassegrains as well without any change. A good video on Barlows and their use can be seen below. Time lapse is undoubtedly one of the best ways to capture the heavens and give a great feeling of how quickly time passes. Below is one such time lapse.
http://petapixel.com/2013/10/05/stunning-time-lapse-mauna-kea-observatories-milky-way/ Just a general update to the Guides section. I have organized the data into three parts. How to choose an astronomical telescope, How to choose a mounting for the astronomical telescope and Equipment for astrophotography with a few techniques.
I have also started this blog today. |
AuthorI have made this website for the welfare of the Human kind interested in knowing more about the Universe outside of Earth. :) I shall keep it up to date with any information I feel relevant to astronomy. Archives
July 2020
Categories |