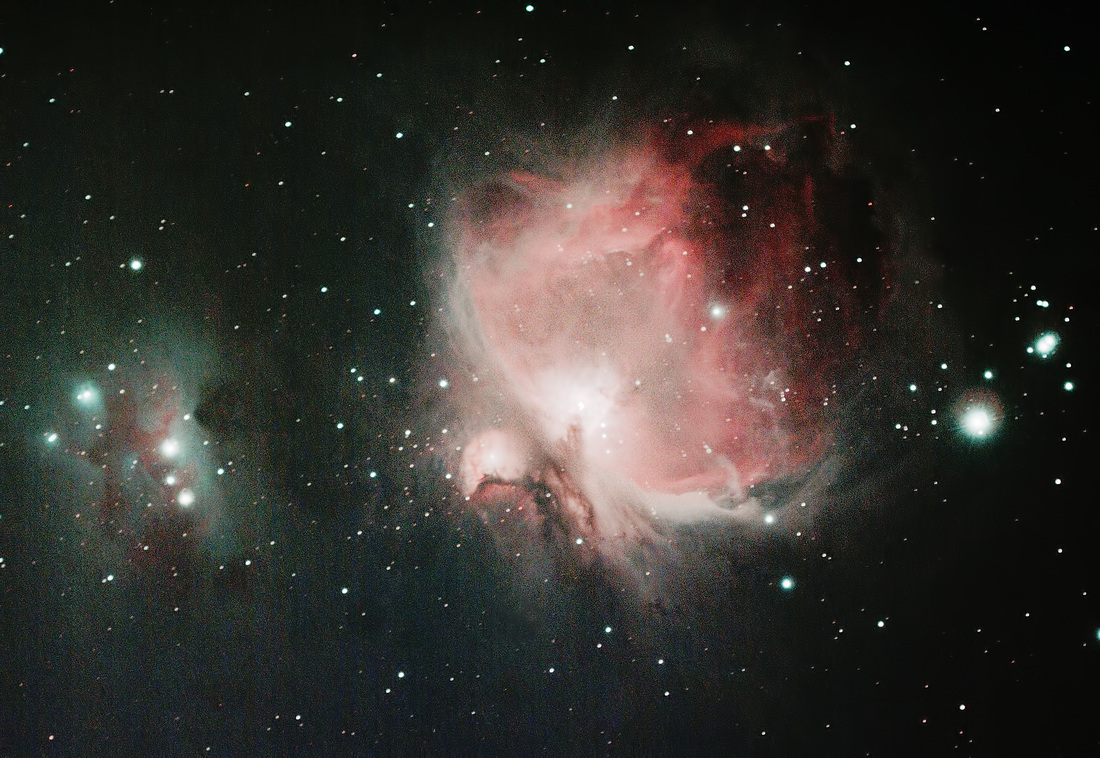
After a long wait I was able to purchase an used Canon 500D which was in pretty good shape. I got it for a mere Rs 8500.00 (approx GBP 85 or US$ 125.00). I followed the method of Gary Honis to remove the internal LP2 filter in front of the sensor. After a few hiccups like rounded screw heads, my patience prevailed and the camera was successfully modified. I then took it for a test run on Saturday night using my Orion 80ED mounted on my Sky-Watcher HEQ5-Pro mount. I captured 82x90s lights, 40 darks and 20 flats, but the flats were ruined due to randon debris falling on the lens from the light box insides. Overall it has been a rewarding experience in terms of the learning as well as the amount of H-alpha light that the camera can now capture. In the near future I will design a cooler for the camera.
0 Comments
Comet C/2014 Q2 Lovejoy is currently the Hot item in the sky and the astronomy community, specially the Amateur astronomers and Astrophotographers are all literally "up in arms" at the comet. Visual astronomers have dusted and cleaned their Big guns while Astrophotographers, including myself are training our small, medium and large aperture scopes at the comet for that "perfect pose". I captured Comet C/2014 Q2 Lovejoy about 10 days agousing my friends Canon 7D, Canon 100mm F/2.8, 24x180s at ISO 1600 tracked using my Astrotrac, Processed using Deep Sky Stacker and Photoshop CS5. A Star chart ( courtesy Sky & Telescope Magazine) can be used above to locate the comet. Astrophotographers can either use a) The NASA JPL Horizons Ephimeris generator to obtain more accurate data. OR b) I use Carte Du Ciel software to control my Equatorial mount and this software can be updated with the come data using the minor planet center database. Alright everyone, here is my latest "creation", if I may call it that. I do have a lot of folks to thank for this at various levels. Rupali Dumbre, Stephen Styris, Golden Valley Art, Sanath Kumar and Santhosh Einstein. It all started long ago when I used to be amazed by photos taken by my friends like Atul Belur and Prakash Subbanna.
I hereby present, From the past week, my HEQ5-PRO Synscan Goto mount has been playing up on me. For one, it displayed pointing error of about 15 degrees. having played around with computerized mounts for over 1.5 years while being employed at Opticstar Ltd, knew all the correct procedures. Initially I assumed it to be a mechanical fault. By checking it multiple times, I can comfortably zero in on software error. How?Checking the rotation in both axes, I find that the for a full 360 deg physical rotation, the readout is 309 degrees, and in DEC the readout for 360 degrees is a mere 270 degrees. One could at this stage assume encoder error.
I then took it out for a star test and found, over two consecutive nights that performing a 3-star alignment displayed the message "Alignment may be poor" and subsequent pointing error, while a 2-star alignment displayed "Alignment successful", followed by good pointing ability to pick out deep sky objects. I have conducted about 12 tests over two nights and the results are the same. I have to now update both the Motor control firmware as well as the Hand Controller firmware and check again if all is well. By the way, I have called this report an Observing report, so the list of objects I observed last night were, M15, M22: Globular star clusters. M39, M34: Open star clusters. M31: Andromeda Galaxy. Almach: Beautiful double star in Perseus. It has been about 50 glorious years since India first launched a rocket. Similar to other space faring nations like USA and Russia we too started small. The first rocket ever to leave Indian soil, specifically at Thumba Equatorial Rocket Launching Station (TERLS) was the american Nike-Apache, a two staged sounding rocket. An indigenous Rohini series sounding rocket weighing a mere 32kg was the first Indian rocket launched from TERLS in 1967. Subsequently we launched the Aryabhatta and Bhaskara satellites, and in about a decade after them launched the Satellite Launch Vehicle (SLV) rocket carrying the 40kg Rohini satellite. As with any space faring nation, we faced a lot of teething problems and the Indian Space Research Organization learned a lot from the SLV and ASLV rocket launches. The Polar Satellite Launch Vehicle was born out of ISRO's learning experiences and was first launched in 1994. This rocket then had a payload limit under 900kg then. We have come a long way since the first launch of PSLV and marking the Silver Jubilee of its launch and the end of the Diwali festival, the majestic PSLV, now a fully grown, mature workhorse of the Indian space program lifted off from the Launch Pad-1 at Satish Dhawan Space Centre-SHAR on 5th November 2013 carrying the 1350kg Mars Orbiter Mission. Not only was the launch a success, India also entered the elite league of nations with the capability to launch a spacecraft into interplanetary space. After orbiting Earth for about 25 days, MOM will fire its thrusters again and embark on a journey towards planet Mars. As I write this article the hair on the back of my neck stands as I wonder about the question "where next?". Ofcourse, ISRO has a few challenges lined up ahead and its best we do not start flying high with attitude as yet. The GSLV is undergoing teething problems and the GSLV MK-III is yet to have its first flight. ISRO is yet to send an Indian into orbit using an Indian launch Vehicle. I therefore wish ISRO the best and look forward to September 14th 2014 when MOM will be captured into orbit around Mars.
The Kavalur Observatory, located approximately 170 km from Bangalore, on the Yelagiri Ranges houses among many telescopes, Asia's biggest optical telescope, which has an aperture of 93 inches. Interestingly, the super structure of the telescope, and the mounting is a scaled down replica of the 200 inch Palomar with a combination of a Horse shoe and Yoke Equatorial mount. This observatory is a destination for ones who want to understand our Universe a little better and the occasional amateur astronomer. Our group consisted of Aditya, Sanath, Sundar and myself, very eager to visit the place once again to rejuvenate our souls. After a high speed 4 hour drive and stopovers at Mc Donalds restaurant we reached Kavalur at about 7:30 PM. We had the customary and sumptuous dinner at the mess hall and headed to Lab-B, the guest quarters. After resting for a while we looked up at the sky to notice clouds and rain eventually followed. We amateur astronomers in Bangalore are a positive lot. A common saying between us is "It will clear after midnight", this chant somehow keeps us awake and enthusiastic. The weather did not disappoint and it did clear at about 11:30PM. We then headed towards the iconic 93 inch Vainu Bappu Telescope at the very top of the hilly facility. This is where we decided to spend most of the night. Aditya was in a very good mood to do wide field photography and setup his 8 inch Sky-watcher newtonian on the NEQ6-PRO mount, piggybacked his Canon 550D DSLR and manually guided the mount to take the photo below. Sanath being a visual astronomer was excited about the number of targets he could cover in a single night with skies that I would rate as Bortle 3. I was also looking forward to using my astrotrac setup for the very first time under the stars. Owing to the clouds I could not have first light. Clouds were trying their best to play spoil sport with us, but our enthusiasm did not change. That is until a wily little fox made his way to our setup, preceded by scary sounds which scared the starlight out of us. We quickly made our way to the car where we spent anxious moments contemplating "were-foxes" and if they like Humans.
This trip was one of the most memorable ones I have made in my life as an amateur astronomer. I hope that more such trips would follow and we all get time to capture the wonders of the Universe through our eyes, and our lenses. Many amateur astronomers who step into astrophotography understandably have many questions regarding imaging sensors. By far, one of the most frequent question is about the Noise (not sound, electronic disturbance) present in the captured frames which is a result of the heat generated in the sensor. The CCD or CMOS sensors like the one shown on the left side are electronic devices that translate the capture of photons to electric signals, read out by the computer as an image. Now since we know that electricity, when flowing through any material which has resistance generates heat, so it does with the sensor. This heat shows up as "noise" in the image. One effective method to rid the images of this heat signature is via the process of dark subtraction. Simply speaking, the astrophotographer will stop light from entering the camera sensor by closing its cap or lid, then initiate one or multiple exposures in the camera with the exact same settings (exposure time and temperature) used to capture the image for which the dark needs to be subtracted. By closing the cap of the camera the intention is to allow no other signal to be captured in the sensor except the heat signature. Therefore, a certain "dark" frame is the heat signature of the sensor for "that" exposure time. Also, as an example, 1 minute dark will have lesser heat shown which corresponds directly to the heat produced because of all the electricity flowing through the sensor. Similarly 5 minute will show more "heat" as the electricity flows through the sensor for a long duration, giving it "time" to heat up the sensor. Therefore, a Dark frame is also like a "Fingerprint" of that property of the sensor, which shows whether it gets heated quickly or not. This is also the reason that some CCD sensors are more expensive than others. The expensive sensors get heated less even if exposed for longer and hence display lesser noise when compared to cheaper CCD chips. The Sony ICX285AQ, used in Starlight Xpress H9, The Opticstar DS-145 ICE, and ATIK 314L series all have this sensor and are more expensive when compared to cameras featuring for example the Kodak 8300 chip. Every exposure therefore needs to have a corresponding The Comet ISON is almost here and we amateur astronomers and astrophotographers only hope that it will survive the swing by the Sun and give us a spectacular show and become what everyone predicted it would. The comet of the Century. Live update about this comet is available at the link below.
Astronomers have found a planet without a host star. It does however belong the Beta Pictoris system. This planet is a young one at a mere 12 million years old and five times the size of Jupiter.
At a distance of 80 light years, it is pretty close to us. For more info click the button. A beginner in Amateur Astronomy often misunderstands the concept of Barlow lenses and their use.Below is my take on the topic. I have cut down quite a bit of information and the information is meant for the absolute novice. The reason I have chosen a Celestron 114mm reflector as an example. I do not intend to support the company or Malign their quality in any way, and it is therefore a mere example. Barlows are used to increase the focal length of the telescope, thereby increasing the magnification obtained. Every telescope has its upper limit, and from a city/town the upper limit for a Newtonian reflector telescope is 35x per inch. Consider a telescope has 4.5 inch mirror (114mm). With this you can get a max of 157x magnification. That 20mm erecting eyepiece supplied with many such telescopes is useless, so its best thrown away. This telescope has a built in barlow inside the focuser. This is not a good thing and is found in cheap quality telescopes. Adding another barlow to it only degrades the view very much. Now secondly, as far as viewing deep sky objects is concerned, these objects are faint. To see them clearly, you need maximum amount of light entering the eye. In other words, the field of view of the telescope has to be maximum. To obtain maximum field of view, you need minimum magnification. That is the focal length of the eyepiece has to be as small as possible, preferably a 30 or 32mm eyepiece will work. If the user uses a barlow and assumes that he/she can see deep sky objects bigger, then the user is wrong. A 2x barlow reduces the field of view by half and a 3x barlow is even worse. With the above telescope I will not recommend a barlow at all. For high magnification, one should purchase a 4mm plossl eyepiece, for low magnification a 32mm plossl eyepiece, or any focal length close to that. Together these will cost about 5000 Rs in India or $40-$50 in USA, but will be useful on any telescope. I have deliberately answered the question of Barlows with reflectors, but they apply towards Refractors and cassegrains as well without any change. A good video on Barlows and their use can be seen below. |
AuthorI have made this website for the welfare of the Human kind interested in knowing more about the Universe outside of Earth. :) I shall keep it up to date with any information I feel relevant to astronomy. Archives
July 2020
Categories |